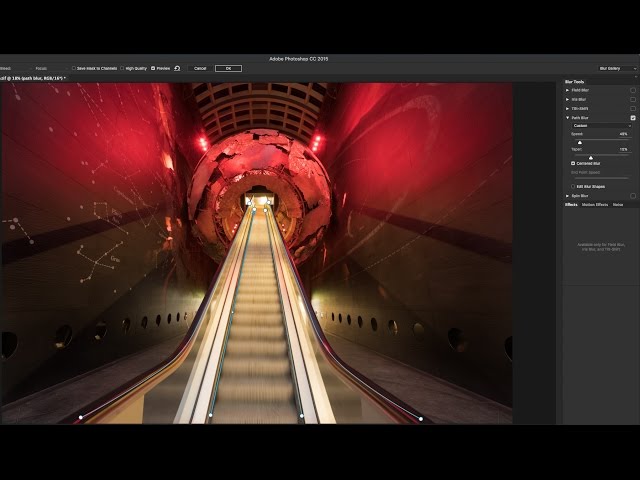
Bring your photos to life with the Path Blur filter in Photoshop in Photoshop CS6

Phạm Văn Siêng 24/09/2019, Cập nhật: 5 năm trước


Use the Blur Gallery to quickly create distinct photographic blur effects with intuitive on-image controls.

Each blur tool provides intuitive on-image controls to apply and control the blur effect. With the blur adjustments complete, use the Bokeh controls to style the overall blur effect. Photoshop provides a full-size, live preview when you work with the Blur Gallery effects.

Choose Filter > Blur Gallery  and then select the desired effect.


For information on other blur effects, see Adjust image sharpness and blur.


Note:

For Lens blurs (Field blur, Iris blur, and Tilt/Shift blur), press the M key to view the blur mask applied to the image. The black areas are not blurred, while lighter areas indicate the amount of blurring applied to the image.


Field blur


Use Field Blur to build a gradient of blurs, by defining multiple blur points with different amounts of blur. Add multiple pins to the image and specify a blur amount for each pin.

The final result is combined effect of all blur pins on the image. You can even add a pin outside the image, to apply the blur at corners.


  1. Choose Filter > Blur Gallery > Field Blur.


    A Field blur pin is placed on the image. Click the image to add additional blur pins.


  2. Click a pin to select it, and do one of the following:

    • Drag the blur handle to increase or decrease the blur. You can also use the Blur Tools panel to specify a blur value.
    • Drag the pin to a new location.
    • Press Delete to remove it.


    Photoshop Field blur pins


    Field blur pins


    A. Unselected blur pin B. Selected blur pin 


Iris blur


Use the Iris blur to simulate a shallow depth-of-field effect to your picture, irrespective of the camera or lens used. You can also define multiple focus points, an effect almost impossible to achieve using traditional camera techniques.


  1. Choose Filter > Blur Gallery > Iris Blur.


    The default Iris blur pin is placed on the image. Click the image to add additional blur pins.


    Photoshop Iris blur


    A. Sharp area B. Fade area C. Blur area 


  2. Drag the handles to move them to redefine the various areas.


  3. Drag the blur handle to increase or decrease the blur. You can also use the Blur Tools panel to specify a blur value.


Tilt-Shift


Use the Tilt-Shift effect to simulate an image taken with a tilt-shift lens. This special effect blur defines area of sharpness, and then fades to a blur at the edges. The Tilt-Shift effect can be used to simulate photos of miniature objects.


  1. Choose Filter > Blur Gallery > Tilt-Shift.


    The default Tilt-Shift blur pin is placed on the image. Click the image to add additional blur pins.


    Photoshop Tilt-Shift blur pin


    A. Sharp area B. Fade area C. Blur area 


  2. Drag the blur handle to increase or decrease the blur. You can also use the Blur Tools panel to specify a blur value.


  3. To define the different areas, do the following:

    • Drag the lines to move them.
    • Drag the handles and rotate.


Path blur


Using the Path Blur effects, you can create motion blurs along paths. You can also control the shape and amount of blurring. Photoshop automatically composites the effects of multiple path blurs applied to an image.


Photoshop Path Blur example


A path blur example


Follow the steps below:

  1. Choose Filter > Blur Gallery > Path Blur.
  2. In the Blur Tools panel, under the Path Blur section, specify whether you want to apply a Basic Blur or a Rear Sync Flash blur. A Rear Sync Flash blur simulates the effect of a flash fired at the end of an exposure.


  1. Use the on-image controls in conjunction with steps 4-8 of this procedure.
  2. Specify the following settings:


Speed

Adjust the Speed slider to specify the amount of path blur you want to apply to the image. The Speed setting is applied to all plath blurs in the image.


Taper

Adjust the slider to specify a taper value. A higher taper value lets the blur trail off gradually.


  1. If necessary, deselect Centered Blur. You may want to deselect this option if you want to apply a more directed motion blur.


    The Centered Blur option helps create stable blurs by centering the blur shape for any pixel on that pixel.


  1. In the Motion Blur Effects tab, specify the following settings:


Strobe Flashes

Set the number of exposures of the virtual strobe flash light.


Strobe Strength

Determine how much blurring is displayed between strobe flash exposures. Strobe Strength controls the balance between ambient light and the virtual strobe flash light.

No strobe effect is displayed if you set Strobe Strength to 0%; only continuous blur is shown. On the other hand, when you set Strobe Strength to 100%, the strobe flashes are produced in full strength but no continuous blur is displayed between flash exposures. Intermediate Strobe Strength values produce a mixture of individual strobe flashes along with continuous blur.


  1. If necessary, adjust the blur amounts at the endpoints.
  2. Optionally, adjust the blur shape guides. Select Edit Blur Shapes to view the guides.
  3. In the blur tool Options bar, click OK to commit the Path Blur effect.


How to use the Path Blur filter in Photoshop to bring your photos to life

photo


Tips for working with the on-image controls


You can use the overlay controls to conveniently create path blurs.

Using the controls, you first define a path for the blur (blue). You can then define a curve for the path, thereby creating new curve points in the path. Once the path has been defined, you can define blur shape guides (red).


Photoshop Define path for blur


Define a path for the blur.


A. Beginning point for the path B. Curve point created while defining a path C. Endpoint for the path along with the blur amount wheel control 


Photoshop Define blur shape guides


Define blur shape guides (note the red arrows).


A. Blur shape guides 


Manipulate blur paths and blur shape guides


  • Click an endpoint to select it.
  • Double-click an endpoint to view the red blur shape guides. Alternatively, select Edit Blur Shapes in the Blur Tools panel to view the guides.
  • Drag endpoints to lengthen the blur path.
  • Cmd/Ctrl-click an endpoint to reduce its blur shape guide to zero.
  • Hover the mouse pointer near a selected endpoint to view the blur amount wheel control.
  • Opt/Alt-click a curve point along the blur path to convert it into a corner point. Opt/Alt-click a corner point to convert it back to a curve point.
  • Shift-drag the red blur shape to move both blur shapes for the path together.
  • Use the Cmd/Ctrl+drag combination to move a path blur.
  • Use the Opt/Alt+Cmd/Ctrl+drag combination to duplicate a path blur.
  • To delete a path blur, with an endpoint selected, press the Delete key.


Spin blur


Using the Spin Blur effect, you can rotate and blur the image around one or more points. The spin blur is a radial blur measured in degrees. Photoshop lets you work with center points, blur size and shape, and other settings, all while viewing a live preview of the changes.


Photoshop Spin Blur


Spin Blur in action


A. Original image B. Spin Blur (Blur Angle: 15°; Strobe Strength: 50%; Strobe Flashes: 2; Strobe Flash Duration: 10°) C. Spin Blur (Blur Angle: 60°; Strobe Strength: 100%; Strobe Flashes: 4; Strobe Flash Duration: 10°) 


Follow these steps:

  1. Choose Filter > Blur Gallery > Spin Blur.
  2. In the Blur Tools panel, under the Spin Blur section, use the Blur Angle control to vary the amount of blurring. You can either specify an angular value (0-360°) or adjust the slider. Alternatively, you can also adjust the blur amount using overlay controls.


Photoshop Vary blurring amount


Vary the amount of blurring using overlay controls.


  1. In the Blur Effects panel, on the Motion Blur Effects tab, specify the following settings:


Strobe Flashes

Set the number of exposures of the virtual strobe flash light


Strobe Strength

Determine how much blurring is displayed between strobe flash exposures. Strobe Strength controls the balance between ambient light and the virtual strobe flash light.

No strobe effect is displayed if you set Strobe Strength to 0%; only continuous blur is shown. On the other hand, when you set Strobe Strength to 100%, the strobe flashes are produced in full strength but no continuous blur is displayed between flash exposures. Intermediate Strobe Strength values produce a mixture of individual strobe flashes along with continuous blur.


Strobe Flash Duration

Lets you specify, in degrees, the length of a strobe flash exposure. Strobe Flash Duration controls the length of the blur for each flash exposure in terms of angular distance along the circumference.


  1. In the blur tool Options bar, click OK to commit the Spin Blur effect.


Note:

You can disable preview from the blur tool Options bar.


Note:

Photoshop automatically blends effects of multiple spin blurs defined for an image.


Tips for working with the overlay controls


Overlay controls depicted in the illustration below are available for the Spin Blur effect.


Photoshop Overlay controls for Spin Blur


Overlay controls for the Spin Blur effect.


A. Rotation point B. Blur ring C. Feather handles D. Ellipse handles 


  • To add a new spin blur, click a desired location in the image.
  • To duplicate a spin blur, use the following keyboard combinations:

    (Windows) Alt+Ctrl+drag

    (Mac) Opt+Cmd+drag
  • To resize the ellipse uniformly, drag an ellipse boundary.
  • To delete a spin blur, press the Delete key while the spin blur is selected.
  • To move a rotation point off-center, use the following keyboard combination:

    (Windows) Alt+drag

    (Mac) Opt+drag


    Repositioning the rotation point is helpful while working with objects viewed at an angle.
  • Hold down the H key to temporarily hide the overlay controls.


Blur effects


You can enhance the overall image, by controlling the appearance of out-of-focus or blurred parts. Specify the bokeh parameters to ensure an overall pleasing effect.

In the Blur Effects panel, specify a value for the following:


Light Bokeh

Brightens the out-of-focus, or blurred areas in the picture.


Bokeh Color

Adds more vivid color to lightened areas that are not blown out to white.


Light Range

Determines the range of tones the settings affect.


Restore noise in blurred areas


Sometimes, after applying a Blur Gallery effect, you may notice that the blurred area of the image looks synthetic or unnatural. You can restore noise/grain to such a blurred image area to give it a more realistic appearance.


Photoshop Restore grain/noise


Restore grain/noise to make blurred areas look more realistic


After using blur controls to achieve the initial effect, follow these steps to restore noise:

  1. In the blur Effects panel, on the Noise tab, ensure that the checkbox in the top-right corner is selected. You may deselect this checkbox at any time to revert any noise previously added to the blurred image area.
  2. Select the type of noise that you want to apply to the blurred area:


    Uniform: Same as the noise added through the Filter > Noise > Add Noise > Uniform option.

    Gaussian: Same as the noise added through the Filter > Noise > Add Noise > Gaussian option.

    Grain: Same as the noise added through the Add Grain option in Camera Raw.


  3. Specify the following settings:


    Amount: Matches the amount of noise with the noise in the not-blurred areas of the image. Adjust the slider between 0-100%.

    Size: (Only for Grain-type noise) Controls the particle size for the noise

    Roughness: (Only available for Grain-type noise) Controls the regularity of the grain. Drag to the left (below 50%) to make the grain more uniform. Drag to the right (above 50%) to make the grain less even.

    Color: Graduated slider controlling the degree to which the noise is colored. To make the noise monochromatic, similar to the effect achieved by enabling the Monochromatic option on the Add Noise dialog (Filter > Noise > Add Noise), drag the slider to 0%. 

    Highlight: For better shadow/highlight matching, reduces noise in the highlighted areas of the image. Adjust the slider between 0-100%.


Note:

Once you specify the settings for a noise type, Photoshop remembers it if you switch back and forth between noise types. For example, when you switch from Grain-type noise to Gaussian-type noise and then back to Grain-type noise.


The blur effects in the Blur Gallery now support Smart Objects and can be applied non-destructively as Smart Filters. This feature also supports Smart Object video layers. To apply a Blur Gallery effect as a Smart Filter:


  1. In the Layers panel, select a Smart Object layer.


  2. Choose Filter > Blur Gallery, and then choose the appropriate effect.


For more information about Smart Filters, see Apply Smart Filters.


See also


* Nguồn: Photoshop CS6

Phạm Văn Siêng 24/09/2019, Cập nhật: 5 năm trước
Ý KIẾN THÀNH VIÊN
    Chưa có bình luận