How Michael Schauer communes with nature in Lightroom Classic

Phạm Văn Siêng 24/09/2019, Cập nhật: 5 năm trước

German photographer Michael Schauer doesn’t just capture spectacular landscapes — he immerses himself in the mood of the environment. His editing process in Adobe Photoshop Lightroom Classic CC strives to combine the essence of a place with the emotions he feels, so even the most isolated, rugged, and barren scene exudes a powerful sense of calm.


Compose the shot


Michael first frames the composition using the Crop tool settings. He sets the Aspect ratio to 2 x 3 / 4 x 6, trimming areas of the sky and beach to draw the viewer’s eye to the important part of the scene. He then adjusts the angle, just slightly, to straighten the horizon.

Pro tip: Michael changes the color of the editing window so the background color doesn’t blend with colors in the image he’s editing. To do this, choose Edit > Preferences (Windows) or Lightroom > Preferences (macOS). Then, choose the Interface tab and select the Fill Color you want from the Main Window drop-down in the Background section.
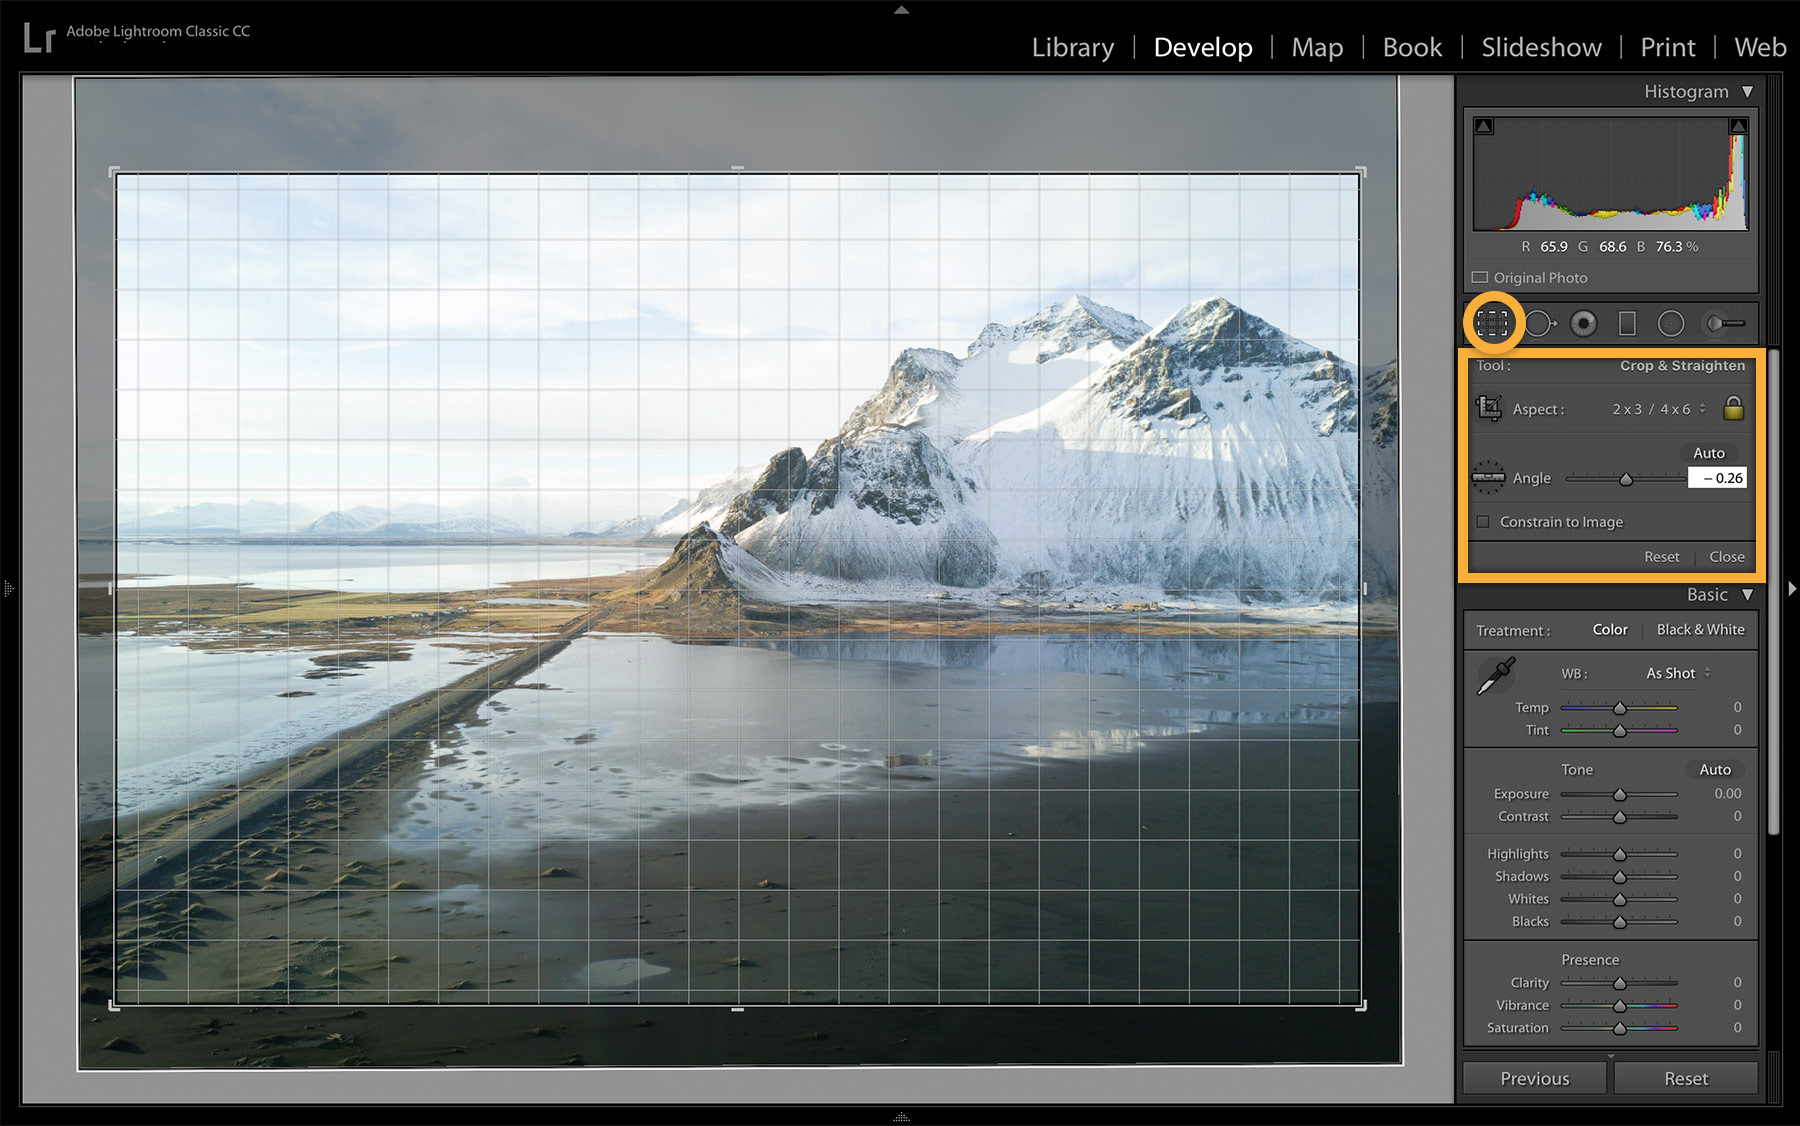


create-landscape-photography_fig1


Fix lens issues


To fix some of the issues commonly caused by the camera lens, Michael uses settings in the Lens Corrections panel. He selects Remove Chromatic Aberration to remove the color fringe around the edges of the objects in the photo. Then, he checks Enable Profile Correction to fix the distortion at the edges of the picture.


create-landscape-photography_fig2


Set the mood


Michael uses settings in the Basic panel to adjust the overall look to more closely match the scene as he saw it. The raw image looks a bit overexposed, so he decreases the Exposure (-0.50 in this case).

There’s not much distinction between the sky and the clouds, so Michael decreases the Highlights (-70) to remove the excess white and bring out the blue of the sky. Next, he adjusts the Shadows (-100) to create a stark contrast between the beach in the foreground and the water and mountains in the background.

Then, he adds a bit of warmth by slightly increasing the Temp and Tint values of the White Balance.


create-landscape-photography_fig3


Michael uses settings in the Camera Calibration panel to change how Lightroom interprets the colors set by his camera. Each change he makes affects the color mix throughout the entire image. He moves the Shadows Tint slider slightly to the left to remove some of the magenta tinting in the shadows by adding a touch of green.

Then, he tweaks the Green Primary Hue and Saturation as well as the Blue Primary Hue and Saturation to adjust the greens and blues throughout the photo.


create-landscape-photography_fig4


Michael adjusts the light levels throughout the photo by adding points to the Tone Curve and individually moving each one to control the overall shadows (dark areas), highlights (light areas) and everything in between. He switches to individual color channels — Red, Green, Blue — adds points, and readjusts to refine the tones throughout the image. At this point, Michael moves back and forth between the Tone Curve and Basic panels to continue to make adjustments.


create-landscape-photography_fig5


Apply focused edits


Michael uses the Graduated Filter to decrease the exposure across the mountains and then, separately, to make the sky more pronounced.

Pro tip: Use the Graduated Filter to modify specific ranges of a photo. Select the Graduated Filter from the editing tools, and then click and drag on the part of the photo you want to modify.


create-landscape-photography_fig6


For the sky, he uses the Graduated Filter to reduce the Highlights so the clouds look a bit darker, to show a cooling temperature of the sky.

Pro tip: Click the center dot and drag to move the filter. Click one of the outer lines to increase or decrease the editing area. Hover the center line to show the double arrow cursor, and then drag to rotate as needed. The edits apply between the outermost lines. The adjustment starts from the top, or left, line and ends at the bottom, or right. The center line is the halfway point of the adjustment. The farther apart the outer lines of the Graduated Filter are, the more spread out the adjustment will be. The closer the lines are, the more concentrated the adjustment will be.


The Adjustment Brush allows Michael to make more specific edits. Here, he uses it to increase Clarity and decrease Highlights over the mountains.

Pro tip: Use the Adjustment Brush to modify custom areas of the photo. Select the Adjustment Brush from the editing tools. Set the brush size, adjust the editing controls as desired, and then brush over the areas of the photo where you want to apply the edits.


create-landscape-photography_fig8


Remove distracting details


It’s common for unwanted objects or marks caused by dust or scratches on the lens to appear in photos. Michael fixes these with the Spot Removal tool. He sets the spot removal brush to Heal and adjusts the brush size as appropriate for the specific repair. He then clicks on a part of the photo with the texture he likes and brushes over the mark caused by the dust, scratch, or uneven lighting.


create-landscape-photography_fig9


Finishing touches


Michael uses the Sharpening settings to bring out more detail throughout the image. He increases each of the settings in the Detail panel to ensure that the scene looks crisp rather than soft and blurry, but without adding noise. The settings Michael used for this photo were Amount: 70; Radius: 1.2; Detail: 46; and Masking: 77.


create-landscape-photography_fig10


Create a custom preset


Once Michael has applied the editing adjustments to his liking, he saves the current state of edits as a custom preset so he can apply the same edits to other photos from this shoot.

Pro tip: To save a custom preset, click the + icon in the Presets panel on the left of the Develop module, name the preset, and click Save. The new preset is now in the list of presets you can apply to other photos.


create-landscape-photography-before-fig11


create-landscape-photography-after-fig11


Before and after


At any point during the editing process, you can see the before and after effects of your changes. In Lightroom Classic CC, click the Y|Y icon below the image preview to cycle between the before and after views. In Lightroom CC, click the Show Original icon (or press /) to cycle between the original and modified versions of the photo.


create-landscape-photography-before-fig12


create-landscape-photography-after-fig12


More about Michael's landscape photography


Be sure to check out the article A Language of Calm: The Photography of Michael Schauer for more inside details on how Michael captures his beautiful shots.


About the artist:


When his band broke up, it didn’t take long for Michael Schauer to discover his next creative endeavor: photography. He picked up his phone and taught himself by taking pictures of the architecture around Munich, Germany. Surrounded by a blend of old churches and modern structures, Michael had plenty of inspiration.


Soon after, he bought a camera and traveled beyond the city limits to explore remote landscapes of mountains, lakes, forests, and glaciers. Michael also learned the ins and outs of Lightroom Classic and Photoshop — both of which he loves to use to this day. He quickly absorbed everything he could about photography, from craft and theory to other photographers’ styles.


Michael finds inspiration in novelist Haruki Murakami’s tales of love, loneliness, and longing, as well as artists like Albert Bierstadt and Caspar David Friedrich, whose paintings provide a portal into other worlds. Whether it’s for his landscape or commercial photography, Michael has a habit of composing frames in his mind wherever he goes — a practice that helps him notice the beauty that surrounds him every day.


Follow Michael Schauer


* Nguồn: Lightroom Classic

Phạm Văn Siêng 24/09/2019, Cập nhật: 5 năm trước
Ý KIẾN THÀNH VIÊN
    Chưa có bình luận