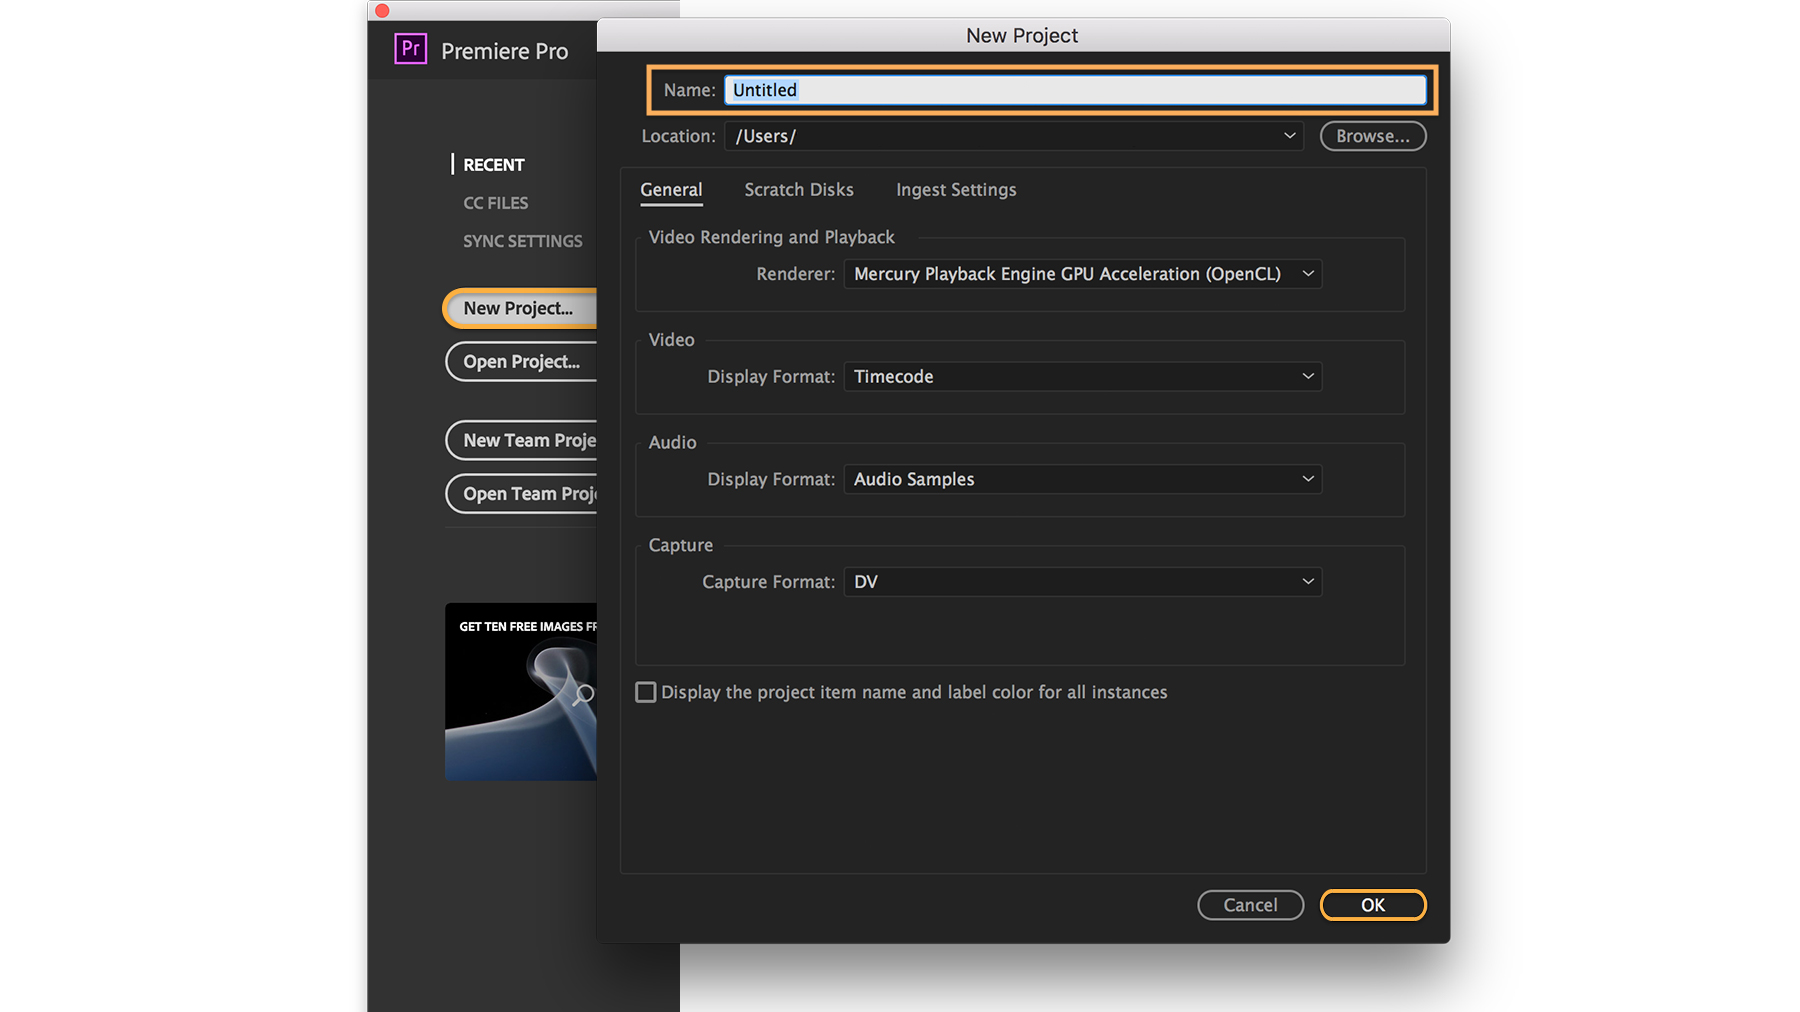
Launch Premiere Pro and click New Project in the Start screen or choose File > New > Project from the main menu. In the New Project dialog box, name your project and click Browse to choose where you want to save it. Click OK when you’re done.
Start your video editing project in Premiere Pro CC
Ready to start editing video with Adobe Premiere Pro CC? Follow these steps to create a new project, add videos and graphics, and apply transitions.


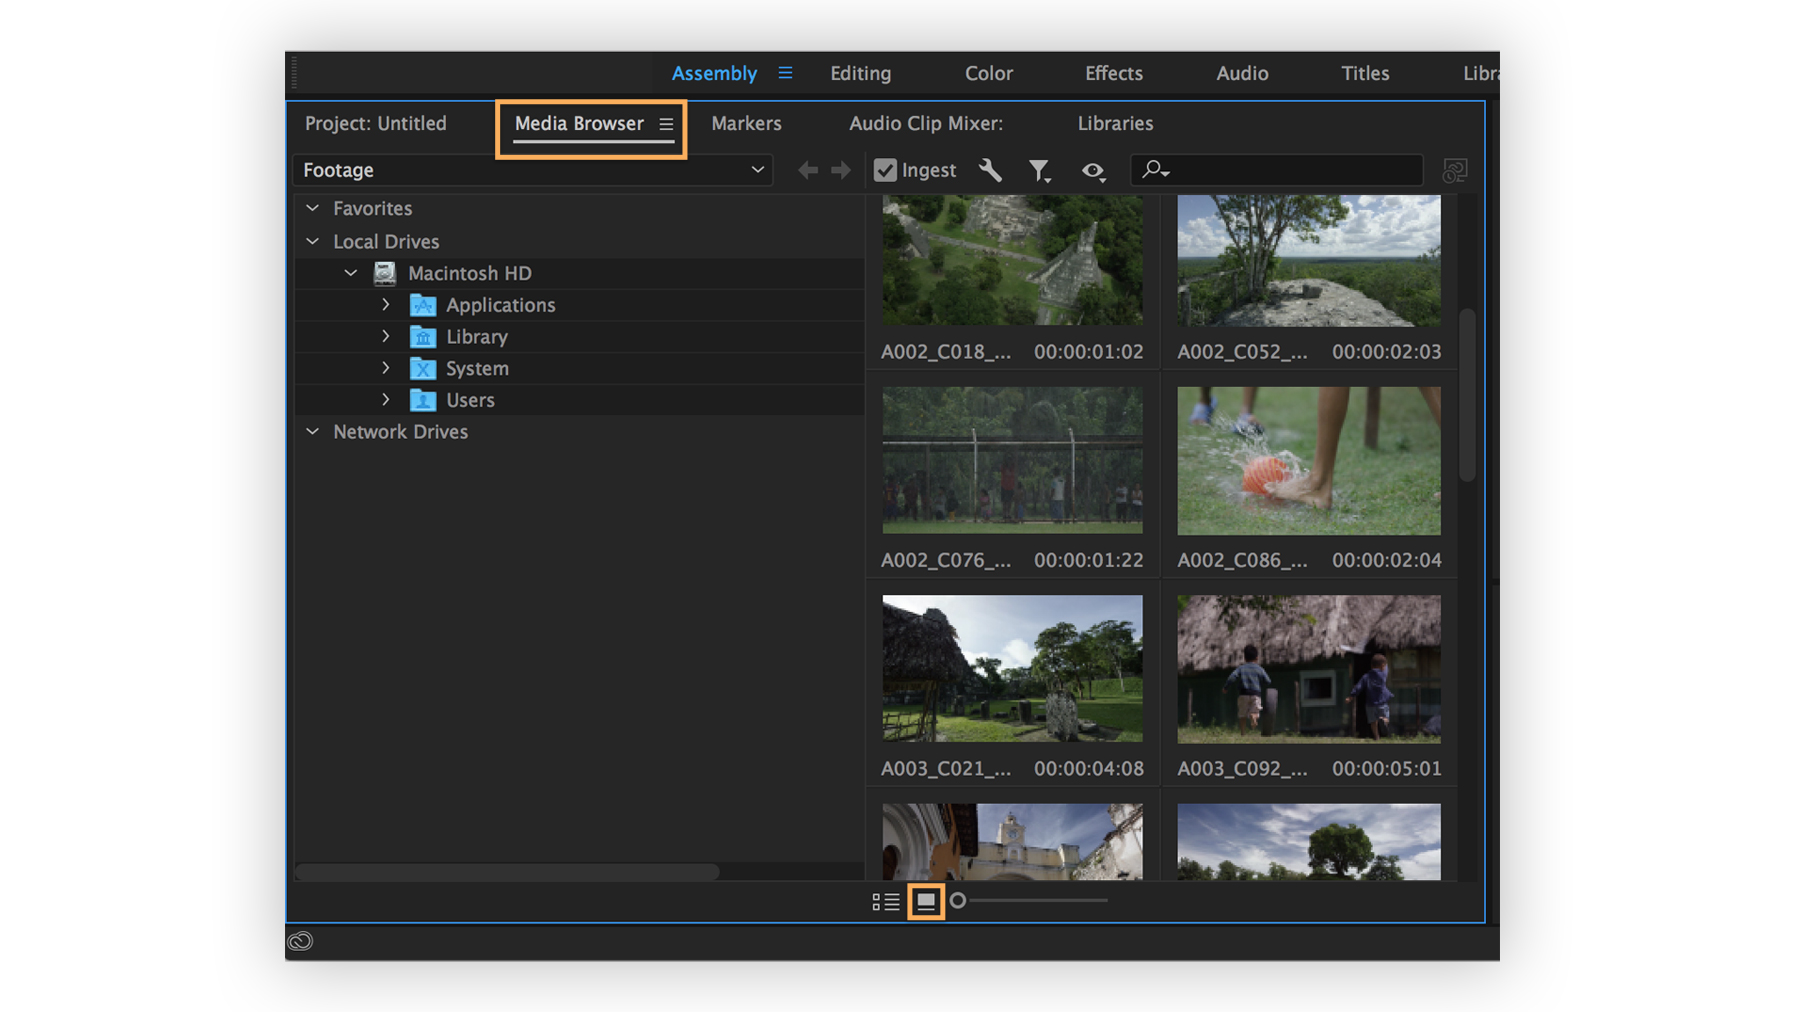
The Assembly workspace is a good place to start. Simply select Assembly at the top of the screen or choose Window > Workspaces > Assembly. Then select the Media Browser tab or choose Window > Media Browser from the main menu. Navigate to your media files — on your local drive or a network drive — and if they appear in a list, click the thumbnail view icon at the bottom of the panel.

Before you import your footage, click the Ingest box at the top of the panel to have Premiere Pro save a copy of your files on your local drive. Otherwise, Premiere Pro will simply link to wherever your files are currently stored, such as a media card that you may later eject or reuse. (This ingest feature launches Adobe Media Encoder CC in the background, which should already be installed on your system.)
Tip: For large projects containing high-resolution media files, it’s a good idea to save your imported media to a dedicated storage drive so you won’t unexpectedly fill up your hard drive. To change the default ingest setting from your local hard drive, click the wrench icon next to the Ingest box and change Primary Destination to the appropriate location.
Slowly glide your cursor over each video thumbnail to preview it. Select a video you want to import, right-click (Windows) or Control-click (macOS), and choose Import from the menu. Repeat this step for each video you want to import.

Switch to the Editing workspace by selecting Editing at the top of the screen or by choosing Window > Workspaces > Editing. Your imported footage now appears in the Project panel. If you don’t see the Project panel, choose Window > Project. Your files may appear in a list; to see thumbnails instead, click the thumbnail view icon at the bottom of the panel.
Now you’re ready to create a sequence — the place where you assemble your video clips and audio along a timeline. Select the first video clip you want to appear in your sequence and drag it from the Project panel to the empty Timeline panel (choose Window > Timeline if it’s not visible).
You can add other clips to this sequence by dragging each one from the Project panel to the Timeline panel and placing them next to another one that’s already there. If you bring in a very long clip that fills up the entire Timeline panel, press the minus (–) key on your keyboard multiple times to zoom out and see more of your timeline. Pressing the plus (+) key multiple times zooms in around the playhead’s position.

Press the spacebar to see what your video looks like so far in the Program panel (choose Window > Program Monitor to reveal it). Press the spacebar again to stop playback. Drag the blue playhead to wherever you want to start playback.
Note: If a particular video clip appears too large or too small in the Program panel as you play your sequence, just right-click (Windows) or Control-click (macOS) the clip in the Timeline panel and choose Set to Frame Size to make the clip correctly fit the viewing area.
To shorten a clip so it shows just what you want (also called trimming), simply drag the edge of the clip to its desired length.
After you play around with changing clip positions and their lengths, make sure there are no gaps in your sequence. If you see one, click the space between two clips to highlight the gap and then press the Delete key on your keyboard to bring the clips together.

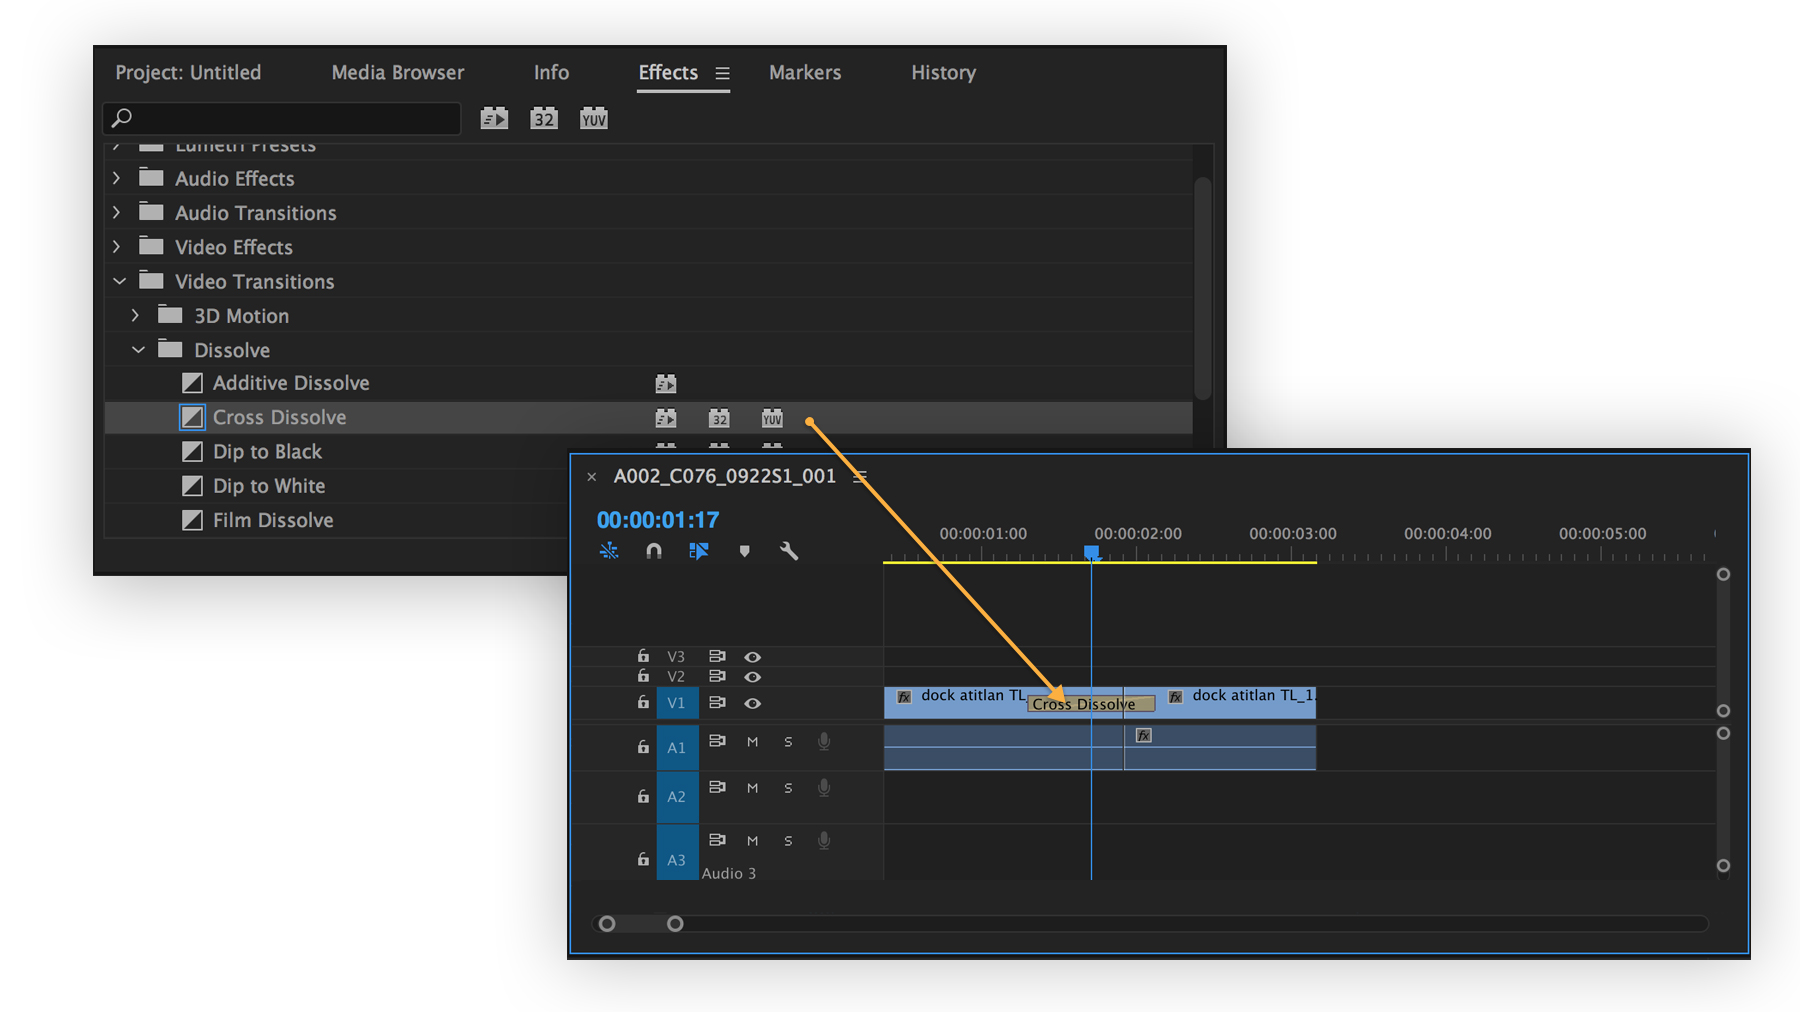
Now that your clips sit side by side in your sequence, you can try adding transitions between them. In the same panel group as the Project panel, you’ll find the Effects panel tab (choose Window > Effects to reveal it). Open the Video Transitions folder and then open the Dissolve folder to see the available dissolve effects. Drag the Cross Dissolve effect between two clips that you previously trimmed and then play your sequence to see how the effect looks.
Have fun experimenting with other dissolve effects between two adjacent clips like Dip to Black or Dip to White.

You’re off to a great start. Check out the rest of this series to see how you can enhance your project by adding titles and graphics and adding and adjusting audio.
* Nguồn: Premiere Pro CC
Ý KIẾN THÀNH VIÊN